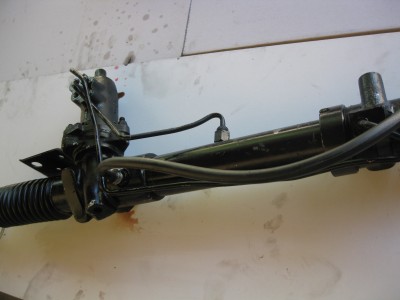
Now, the power steering rack in the Jaguar E-type was an Adwest Pow-a-Rak. Adwest is a UK firm that is still in business and indeed the Pow-a-Rak line still exists and is used by Bentley! You can check out Adwest here http://www.adwest-engineering.co.uk/. Alas though – they will not be much use in helping with the 40 year-old rack in your E-type. Nor do I think you can purchase a new Bentley rack and throw it into the E-type!
By the way – the next few posts on the steering rack pertain to a Series II 2+2 car with power steering, automatic transmission and air conditioning. I know for example that the Series III rack – although similar looking has some important internal differences.
IF YOU HAVE A SERIES III (V-12) E-TYPE HERE IS A GREAT SITE ON REBUILDING THE PUMP AND THE RACK! http://www.animlwiki.net/EType/Steering.htm ALAS – THIS SITE IS NO LONGER ACTIVE. IF YOU KNOW THE AUTHOR PLEASE HAVE HIM GET IN TOUCH!
You can purchase well rebuilt racks at Coventry West – and these are very carefully done – http://www.coventrywest.com/Rebuilt-Power-Steering-Racks-The-Big-Difference.htm. SNG Barratt also has them http://www.sngbarrattusa.com/ as does XKs Unlimited http://partsxks.com/. They are all in the $500 range and require a usable core or you are on the hook for an additional $700 to &1000… If you think your rack is in decent shape despite the leak you can do a rebuild and replace all of the seals. This will run you a bit less than $100 to perhaps $200 depending on what you need. In some ways a rebuilt rack that you bolt in is not a bad option – but where is the fun in that!
In any case – if you are going to remove the rack to ship to one of the firms above as a core to swap for a rebuilt one – or you want to try to rebuild your old rack – you have to get the leaking one out of the car. The easiest way to do this (and believe me I have tried a number of geometric contortions) is to jack up the front end and open the hood wide (see my earlier post on how to do this). Once the road wheels are off you have to unbolt and separate the tie-rods. You also have to undo the high and low pressure lines from the pump. You will want to replace these hoses at this point and they are not cheap. Since you have had to drain all the power steering fluid – which in these cars was originally automatic transmission fluid – you may want to rebuild your power steering pump at this time. While you are at it – replace the filter that is in the power steering reservoir.
Now comes the fun – you need to drain the coolant from the car and remove the radiator in order to get the rack out. You may as well do this early as it gives better access to the rack mounts. Also – remember that there are two lines going to and from the automatic transmission for cooling the fluid there. You need to take these off also. Yup – a lot of
liquids to contend with!
In addition to all the liquids and hoses, you have to remove the fans and the shroud. As the radiator is heavy and the fans and shroud delicate it is better to take the latter off and put them aside prior to pulling out the radiator. It does not take much time.
By the way – once the fans are gone it looks like there is almost enough room to get the rack out… However, because the tower on the rack is so long I have not found it possible to get the geometry right. I have heard of other people loosening and then tilting the radiator forward and getting clearance – but in this case the air conditioning plumbing precluded this. Everything is way easier with the radiator out.
Here is one piece of good news. The heat exchange coils for the air conditioning sit in front of the radiator – but typically you do not have to remove these from the frame. You can pull the radiator without pulling the air conditioning coils – at least in the case of my car.
Now, once all the fans are out and the radiator gone it is pretty easy to use an allen key to loosen the collar that secures the steering shaft to the rack. You can then unbolt the steering rack mounts and rotate the rack to get it off the car. It is heavy and still requires some rotation and careful movement. One person with reasonable strength can do it – but it is easier with two. Voila – you now have your leaky rack out and ready for surgery!


This site is no longer available…..Please can you send me his email address so that I can contact him directly.
IF YOU HAVE A SERIES III (V-12) E-TYPE HERE IS A GREAT SITE ON REBUILDING THE PUMP AND THE RACK! http://www.animlwiki.net/EType/Steering.htm
LikeLike
Hi Steve – You are right. It is gone (the whole hosting site is gone). I do not have author contact info – sigh. I do have the text – without pictures though. I could email you that for educational purposes. It is not my work and I cannot post it on the web.
LikeLike
Hello, does anyone has an update on this topic please? Many thanks, Stefan
LikeLike
Hi – the rebuilt rack has been working fine for over a year now. By the way – A while go I had a chat with someone at Coventry West in Georgia and they mentioned potentially swapping a leaky but decent power rack for one of their non-power ones. Good luck
LikeLike